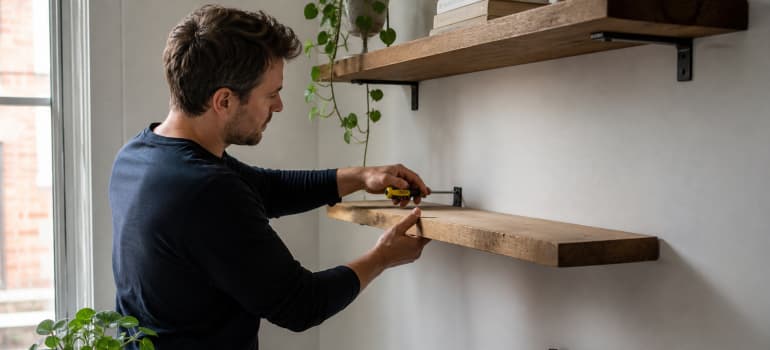
You’ve picked the shelf. You’ve measured the wall. Now you’re standing there with a drill in one hand and a bracket in the other, wondering if you’re about to make a very expensive mistake. Installing floating shelves looks simple. Sometimes it is. But get the wrong fixings for your wall type, skip the level, or underestimate the weight, and you’ll come home one day to find your shelf and everything on it on the floor.
This guide walks you through how to install floating shelves properly, from checking your wall to testing the finished result.
TL;DR
- Always identify your wall type before you buy fixings or drill anything.
- Plasterboard walls need stud fixing or specialist toggles, not standard wall plugs.
- Use a spirit or laser level to get the shelf straight before committing to any holes.
- Drill pilot holes, secure brackets firmly, then mount the shelf and test it properly.
- Check weight limits and inspect fixings every few months to keep everything safe.
Table of Contents
What Wall Type Do You Have and Why Does It Matter?
Your wall type determines everything: which drill bit you use, which fixings you buy, and how much weight your shelf can safely hold. Fitting masonry fixings into plasterboard, or using lightweight plugs in brick, are both recipes for a shelf that won’t last the month.
Most UK homes have one of two wall types you’ll encounter when installing floating shelves. Knowing which one you’re dealing with before you pick up the drill is genuinely the most important part of the job.
Plasterboard (Stud) Walls
These are the hollow-sounding walls common in modern builds and partition walls throughout all kinds of UK homes. Knock on them and you’ll hear a hollow thud. The plasterboard itself offers almost no load-bearing strength on its own. The real support comes from the timber or metal studs running behind it at regular intervals, typically every 400mm or 600mm apart.
If you can hit a stud, use it. If you can’t, you’ll need specialist toggle bolts or cavity anchors rated for the load you’re placing on the shelf. Standard wall plugs pushed into bare plasterboard will pull straight out under any real weight. Don’t try it.
Masonry Walls
Brick, block, or stone walls are solid and much more forgiving when it comes to load capacity. These are the external walls in most UK homes, and sometimes internal walls in older properties. They give you a lot more flexibility with bracket placement because the fixing goes into something genuinely solid. You’ll need a masonry drill bit and appropriate wall plugs rated for the load, but the wall itself won’t let you down if you use the right kit.
Not sure which you’ve got? Knock the wall with your knuckle. A hollow thud means plasterboard. A dull, solid sound means masonry. You can also try a small nail. If it goes in easily by hand, it’s plasterboard. If it barely scratches the surface, you’re dealing with brick or block.
Check also:
What Tools and Materials Do You Need?
Getting halfway through installation and discovering you don’t have the right drill bit is exactly as annoying as it sounds. Get everything together before you start.
Tools You’ll Need
- Power drill, for drilling pilot holes and driving screws. A combi-drill is ideal since it handles both masonry and wood screws.
- Stud finder, essential for plasterboard walls so you know where the structural support sits behind the surface.
- Spirit level or laser level, a shelf that’s even slightly off-level looks wrong immediately and bothers you every single day. Don’t skip this.
- Pencil, for marking drill points on the wall before you commit to any holes.
- Tape measure, for spacing brackets evenly and setting the shelf at the right height.
- Screwdriver, for tightening fixings by hand if needed, and for final adjustments.
- Cable and pipe detector, for checking what’s behind the wall before you drill anywhere you’re not certain about.
Materials You’ll Need
- Floating shelf brackets or hidden rod system, hidden brackets (steel rods that slide into the shelf) give the cleanest look. Surface-mounted brackets are easier to install and usually stronger for heavier loads.
- Wall plugs, the type depends entirely on your wall. Plastic plugs for masonry, toggle bolts or cavity anchors for plasterboard.
- Screws, match the screw length and gauge to your fixing type. Too short and they won’t grip; too long and they can damage pipes or wiring behind the wall.
- Drill bits, masonry bits for brick and block, standard bits for timber studs. Have a few sizes on hand.
How to Install Floating Shelves: Step-by-Step
Take it one step at a time and you won’t go wrong. Rush any of these and you’ll be filling holes and starting again.
A complete step-by-step process for installing floating shelves securely on any wall type.
-
Identify Your Wall Type and Locate Studs
Knock the wall to confirm whether it’s solid masonry or hollow plasterboard. If it’s plasterboard, run a stud finder along the wall at the height where you plan to fit the shelf. Mark the stud positions with a pencil. If you can position at least one bracket over a stud, do it. It makes a real difference to the shelf’s overall strength.
-
Mark Your Shelf Placement
Hold the bracket or shelf up against the wall at the desired height and use a pencil to lightly mark where it will sit. Place your spirit level across the bracket or along the shelf position and adjust until the bubble is centred. Mark your drill points precisely. Double-check the marks before you drill, because fixing holes in the wrong place means filling and starting over.
-
Drill Pilot Holes
Select the right drill bit for your wall type: masonry bit for brick or block, wood bit if you’re drilling into a timber stud. Drill at a steady, straight angle. Going in at a slight downward tilt can cause the fixing to work loose over time. Keep the drill as level as possible and clear dust from the hole before inserting plugs.
-
Secure the Brackets with Appropriate Fixings
Push wall plugs into the holes until they sit flush with the wall surface, then drive the screws through the bracket holes and tighten firmly. For toggle bolts in plasterboard, follow the manufacturer’s instructions carefully. Most require folding the toggle, pushing it through the hole, then pulling back as you tighten the screw. The bracket should feel completely immovable when you’re done.
-
Mount the Shelf
Slide the shelf onto the brackets or rod system. If you’re using a hidden rod system, slot the rods fully into the pre-drilled holes in the shelf back and push it snug against the wall. For surface-mounted brackets, place the shelf on top and secure any provided screws up through the bracket into the shelf base. Check level again once the shelf is in place, as it can shift slightly during mounting.
-
Test Stability and Make Adjustments
Before loading anything onto the shelf, apply firm downward pressure with both hands at the front edge and check for any movement. If it flexes or shifts, tighten the fixings or check that the plugs are seated properly. If a fixing feels loose in the wall, remove it, insert a larger plug or a different anchor type, and re-secure. Only load the shelf once it feels completely solid.
Check also:
How Do You Keep Floating Shelves Secure Over Time?
A floating shelf doesn’t stay secure on its own. The fixings can loosen over time, the load can shift, and walls, especially plasterboard, can degrade around anchor points if the weight is unevenly distributed. A quick check every few months is all it takes to stay ahead of any problems.
Weight distribution is the most common thing people get wrong after installation. Piling everything heavy at one end creates a levering force that puts far more strain on the nearest bracket than the total weight alone would suggest. Spread heavier items across the full length of the shelf, with lighter things towards the edges.
It’s also worth being realistic about load limits. Most floating shelves are rated to carry somewhere in the range of 15–30 kg, but this varies considerably depending on the fixings, the number of brackets, and the wall type. Masonry walls with proper plugs will handle the upper end of that range comfortably. Plasterboard with cavity anchors is more variable, and the safe limit drops fast if the anchors aren’t hitting studs. If you need a shelf that holds a lot of weight, a full run of hardback books, for example, or heavy kitchen equipment, masonry is the right wall for the job.
When you do your periodic checks, give each bracket a firm tug and check that the screws haven’t started to work loose. If a fixing feels at all wobbly, deal with it straight away. A slightly loose anchor doesn’t get better on its own. It only gets worse as the shelf flexes under daily use.
If you’d rather hand the job off entirely, a shelf and picture mounting service takes care of wall assessment, fixing selection, and installation, so you don’t have to think about any of it.
What Are the Most Common Floating Shelf Installation Mistakes?
Most floating shelf failures come down to a handful of very avoidable mistakes. Here’s what goes wrong most often.
Using the Wrong Fixings for the Wall Type
This is the number one cause of shelf collapse. Standard plastic wall plugs rely on the wall material gripping them under compression. In plasterboard, there’s nothing to compress against, so they pull straight out. Always match the fixing to the wall, not to what you happen to have in the drawer.
Skipping the Level Check
It’s tempting to eyeball it, especially for a small shelf. Don’t. Even a couple of millimetres off-level looks obvious once items are sitting on it. Take two minutes with a spirit level before you drill and you’ll save yourself the frustration of redoing it.
Not Drilling Deep Enough
A pilot hole that’s too shallow means the wall plug won’t seat properly. The screw will either feel tight without actually gripping, or won’t go in fully. As a rule, the hole should be deep enough to fit the full length of the wall plug plus a few millimetres.
Overloading the Shelf
It seems fine at first. Then over weeks the fixings slowly work loose as the wall material around them fatigues under constant strain. Always check the weight rating of your specific brackets and fixings, and stay comfortably under the maximum. When in doubt, add more brackets rather than pushing the existing ones to their limit.
Ignoring What’s Behind the Wall
Pipes and electrical cables run behind walls in places you might not expect. Drilling into a cable is dangerous; drilling into a pipe is expensive. Use a cable and pipe detector before you drill anywhere you’re not certain about. It’s a cheap tool that prevents a very costly problem.
Using Too Few Brackets
If your shelf is longer than around 60cm, one bracket in the middle isn’t enough regardless of how strong the fixing is. The shelf will flex under load and the single fixing point bears all the stress. Use at least two brackets, ideally positioned at roughly a quarter of the shelf length in from each end.
Check also:
A Complete Guide to Removing Wall Plugs Safely and Effectively
Frequently Asked Questions
How much weight can a floating shelf hold?
This varies depending on the fixings used, the number of brackets, and the wall type. Masonry walls with correctly rated plugs will handle more weight than plasterboard with cavity anchors. Always check the weight rating stated by the bracket manufacturer and stay well within that limit rather than pushing it. If in doubt, add an extra bracket rather than relying on fewer fixings.
Do I need to use a stud finder for every installation?
For plasterboard walls, yes, always. Plasterboard offers almost no load-bearing strength on its own, so fixing into a timber stud behind it is far more secure. For solid masonry walls, a stud finder isn’t relevant since you’re drilling directly into brick or block. The tool is specifically for locating hidden timber framing behind hollow walls.
What should I do if the shelf starts sagging?
Sagging usually means one or more fixings are starting to fail. Take the shelf down, check each wall plug and screw for signs of movement or wear, and replace any that feel loose. Redistribute the load more evenly, and if the shelf is carrying heavy items over a wide span, consider adding an extra bracket in the middle for additional support.
Can floating shelves be installed on masonry walls?
Yes, and masonry is actually the ideal wall type for floating shelves because of its load-bearing strength. You’ll need a masonry drill bit sized to match your wall plugs, and wall plugs specifically rated for masonry use. Drill cleanly at a straight angle, clear the dust from the hole before inserting the plug, and you’ll have a very solid fixing point.
How far apart should floating shelf brackets be positioned?
As a general rule, brackets should sit at roughly a quarter of the shelf’s total length in from each end. So on a 120cm shelf, brackets would sit around 30cm in from each side. For shelves longer than about 60cm, one central bracket is not enough. The shelf will flex under load and place all the strain on a single fixing point.
Need your floating shelves fitted today?
Enter your postcode to view our rates and availability in your area.
For questions about the services we offer visit our main site
Conclusion
Installing floating shelves isn’t complicated, but it rewards the people who take their time over the basics. Know your wall type, choose fixings that match it, check the level before you drill, and test the result properly before you load anything onto it. Those four things prevent the vast majority of floating shelf failures.
Once they’re up and solid, they’re brilliant. A well-fitted shelf adds real storage, looks clean, and lasts years without any trouble. Put in the groundwork at the start and you’ll spend the rest of the time enjoying them.



Leave a Reply