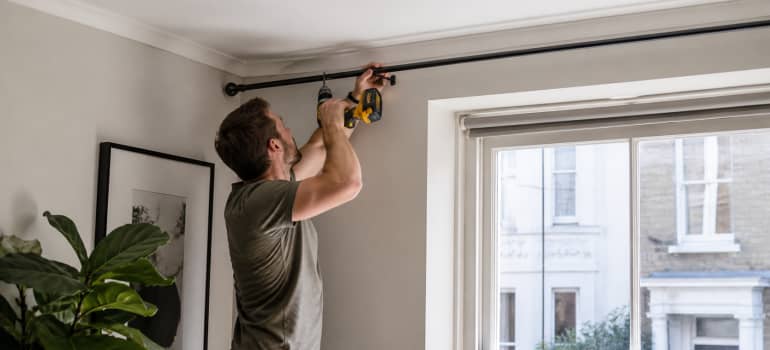
You’ve bought the curtains, found the perfect pole, and now you’re standing in front of the window with a drill in hand wondering where it all goes wrong. Because it does go wrong. A pole that droops in the middle, brackets that pull clean out of the wall, or one side sitting a full inch higher than the other, these are the frustrations that turn a Sunday afternoon job into a week-long eyesore. Knowing how to put up a curtain pole properly isn’t complicated, but it does require the right approach from the start.
This guide walks through every stage of the process, from measuring and choosing the right fixings to drilling, securing the brackets, and sorting the problems that crop up when things don’t go to plan.
TL;DR
- A curtain pole should be fixed with wall anchors suited to your wall type, the right fixing makes all the difference.
- Measure the height and width carefully before you drill anything, mistakes here are hard to reverse.
- Use a spirit level to keep brackets aligned, not your eye.
- Poles wider than 150cm generally need a centre support bracket to prevent sagging.
- Plasterboard walls need specialist hollow wall anchors, standard plugs won’t hold.
- Hang the curtains before fully tightening everything so you can make small adjustments.
Table of Contents
What Tools and Materials Do You Need to Put Up a Curtain Pole?
Getting everything together before you start saves you mid-job trips to the shed. There’s nothing more annoying than getting the brackets up and realising you’ve run out of rawl plugs. Here’s what you’ll actually need.
- Power drill, essential for making clean, accurate holes. A cordless drill is easiest to manoeuvre. Use a masonry bit for brick or plaster walls, and a wood bit if you’re drilling into timber frames.
- Measuring tape, you’ll use this more than anything else. Measure the window width, the distance from the window frame, and the height from the floor. Every measurement matters.
- Spirit level, critical. Eyeballing it never works. Even a small level is enough to stop you ending up with a noticeably sloping pole.
- Pencil, mark every hole before you drill. Light marks, not deep gouges in the wall.
- Wall anchors and screws, the type depends entirely on your wall. Rawl plugs for solid walls, hollow wall anchors for plasterboard. This is the most important material choice you’ll make.
- Screwdriver, for tightening bracket screws once the plugs are in. A manual screwdriver gives you more control than a drill at this stage, so you don’t overtighten and strip the fixings.
- Stud finder, useful if you’re working on a plasterboard wall. Hitting a timber stud gives you a genuinely solid fixing without needing hollow anchors at all.
- Hammer, for tapping rawl plugs flush into the wall once the holes are drilled.
If you don’t own a drill, most hardware shops rent them out by the day. It’s worth it. Trying to get clean holes without one is a nightmare and the results are never as good.
Check also:
How to Put Up a Curtain Pole
The process is more straightforward than most people expect. The key is doing everything in the right order. Rushing to the drilling stage before you’ve confirmed your measurements is where most jobs unravel. Take your time at the planning stage and the actual installation is quick.
How to install a curtain pole from measuring the window to fixing the final bracket securely in place.
Measure the window width and decide on pole length
Measure your window from one side of the frame to the other. Your pole should extend beyond the frame on each side, typically 15cm to 30cm, so the curtains can be pulled fully clear of the glass when open. This lets in maximum light and makes the window look wider. Mark the total intended pole length on the wall lightly with a pencil.
Mark the height for your brackets
Decide how high above the window frame you want the pole to sit. Most poles work best when fixed 10cm to 20cm above the frame, though higher can make ceilings feel taller. Use your measuring tape to mark the same height on both sides of the window. This must be identical on each side. Even a centimetre’s difference will show once the curtains are hanging.
Mark the bracket positions
Hold the first bracket against the wall at your marked height and use a pencil to mark through the screw holes. Repeat on the other side. If your pole needs a centre support bracket, measure the midpoint of the pole and mark that position too. Double-check all marks are at the same height using your spirit level before you touch the drill.
Identify your wall type and choose the right fixings
Knock on the wall gently. A solid thud means brick or block, use masonry drill bits and rawl plugs. A hollow sound means plasterboard, use hollow wall anchors or locate the studs behind it with a stud finder and screw directly into those. Getting this wrong is the single biggest cause of brackets pulling out under the weight of heavy curtains.
Drill the holes
Select the correct drill bit for your wall type and drill each marked hole to the depth of your wall plug. Keep the drill level and straight. Angling the holes makes the plugs harder to seat and weakens the fixing. Tap rawl plugs into each hole with a hammer until they sit flush with the wall surface.
Fix the brackets to the wall
Line each bracket up with its holes, insert the screws, and tighten them firmly. Don’t overtighten to the point of cracking the plaster, but make sure there’s no wobble in the bracket at all. Give each one a firm tug. If it moves, the fixing isn’t right, stop and address it before moving on.
Attach the pole and hang the curtains
Thread your curtain rings or eyelet curtains onto the pole before you fix it into the brackets. This is much easier than trying to add them once it’s up. Slot the pole into the brackets and secure the end caps or locking screws. Hang the curtains, then use your spirit level one final time to check the pole is straight. Make any small adjustments before fully tightening the bracket screws.
Check also:
Common Mistakes and How to Avoid Them
Most curtain pole problems aren’t caused by bad luck. They’re caused by the same handful of mistakes, made at the same points in the process. Here’s what to watch for.
Not measuring the height consistently on both sides
This is the most common mistake, and it shows immediately. People measure up from the window frame on one side, then up from the floor on the other without realising it. The fix is simple: always measure from the same reference point on both sides, then check both marks with a spirit level before drilling. Do this every time without exception.
Using the wrong wall fixings
A standard rawl plug in a plasterboard wall will hold for a week, maybe two, then slowly pull loose under the weight of the curtains. It’s not a matter of if, it’s when. Plasterboard needs hollow wall anchors that spread the load behind the board, or you need to screw directly into the timber stud frame behind it. If you’re not sure what your walls are made of, find out before you drill anything.
Skipping the centre support bracket
A lot of people skip the centre bracket because they don’t want the extra fixing in the middle of the wall, or they assume the pole is strong enough to span the gap. For shorter poles it often is. But once you’re dealing with a pole over 150cm, heavy fabric will gradually pull the middle down into a visible bow. It doesn’t happen overnight, but it will happen. Fit the centre bracket. It’s far less noticeable than a sagging pole.
Making the pole too short
If the pole only covers the window width exactly, the curtains block the glass even when fully open. That’s a common result of buying a pole that matches the window width rather than extending well beyond it on both sides. The general rule: extend at least 15cm past the frame on each side. On larger windows, 25cm to 30cm is better. This affects both light levels and how spacious the room feels.
Troubleshooting Common Installation Issues
Even when you follow the steps carefully, things sometimes don’t go perfectly. Here are the most common problems and how to deal with them properly, not just paper over them.
The pole is uneven after fitting
You’ve stepped back and one side is clearly higher. Don’t panic. If the brackets have slotted holes rather than fixed ones, you may be able to loosen the screws and slide the bracket slightly up or down. If not, remove the lower bracket, fill the old holes with filler, let it dry, and re-mark the position using your spirit level before re-drilling. It’s an extra half hour, not a catastrophe. Filler and a bit of paint covers everything cleanly.
A bracket is loose or wobbling
If a bracket wobbles after fitting, the fixing isn’t holding. Remove the screw and check the plug. If the plug spins in the hole rather than gripping, the hole is too big. Fill it with filler, let it cure fully, then re-drill. If the plug seems fine but the bracket still moves, try a slightly longer or thicker screw. On plasterboard, a wobbling bracket usually means you’ve missed the stud, switch to a proper hollow wall anchor instead.
The pole sags in the middle
A pole sagging in the middle almost always means one thing: no centre support. The fix is to add one. Mark the midpoint of the pole, take it down, fix a centre bracket at that point using the same method as the end brackets, then rehang the pole. If you’ve already got a centre bracket but the pole still sags, check whether the bracket collar is actually clamping the pole or just sitting loosely around it. Tighten the locking screw firmly.
Dealing with unusual window sizes or awkward walls
Bay windows, very wide spans, or walls made from a mix of materials need a bit more thought. For bay windows, you’ll need angled brackets or a purpose-made bay pole kit that bends to follow the angles. For mixed walls, treat each bracket independently. Identify the material at each fixing point and choose the appropriate anchor for that spot. Don’t assume what works on one side will work on the other.
Check also:
A Quick Reference: Wall Types and the Right Fixings
Choosing the wrong fixing is the most expensive mistake you can make, not in money, but in having to redo the whole job. Use this table as a quick reference before you buy anything.
| Wall Type | Drill Bit Needed | Best Fixing |
|---|---|---|
| Solid brick or block | Masonry bit | Rawl plug and screw |
| Plasterboard (no stud) | Wood or general purpose bit | Hollow wall anchor / toggle anchor |
| Plasterboard over timber stud | Wood bit | Screw directly into stud |
| Dot-and-dab plasterboard | Masonry bit | Long hollow wall anchor reaching the blockwork behind |
| Timber window surround | Wood bit | Wood screw direct |
Dot-and-dab walls deserve a specific mention because they catch people out. These are plasterboard sheets bonded to a masonry wall with blobs of adhesive, which means there’s often a small cavity between the board and the brickwork behind it. A short anchor won’t reach the brick. You need a longer hollow anchor that spans the cavity, or you need to drill all the way through to the solid wall and use a masonry plug.
If you regularly have a mix of small jobs building up around the house, a professional curtain fitting service takes care of window dressing installations from start to finish, including the measuring, fixing, and finishing that’s easy to get wrong on your own.
Check also:
Frequently Asked Questions
What height should a curtain pole be installed at?
There’s no fixed rule, but the most common guidance is to fix the pole 10cm to 20cm above the window frame. Positioning it higher, closer to the ceiling line, can make a room feel taller and works well with floor-length curtains. The key is consistency, the same height on both sides, rather than hitting a specific number. Let the proportions of the room guide you.
How do you know if you need a centre support bracket?
A centre support is generally needed when the pole is longer than 150cm. The heavier your curtain fabric, the more important it becomes. If the pole is lightweight and you’re hanging dense, lined curtains, fit the support regardless of the pole length. It’s much easier to do during installation than to go back and add it once the curtains are already hanging.
Can curtain poles be installed on plasterboard walls?
Yes, but you need the right fixings. Standard rawl plugs are designed for solid walls and won’t hold reliably in plasterboard. Use hollow wall anchors, which expand behind the board once inserted, or locate the timber studs running vertically behind the plasterboard with a stud finder and screw directly into those. Studs give the strongest possible fixing and are worth finding before you reach for the hollow anchors.
How far should the curtain pole extend beyond the window frame?
Aim for at least 15cm beyond the frame on each side. On wider windows, 25cm to 30cm works better because it allows the curtain fabric to stack further off the glass when open, letting in more light. A pole that barely clears the frame leaves curtains partially covering the window even when drawn back, which makes the window look smaller than it is.
Do I need to find a stud before drilling into a plasterboard wall?
Not always, but it’s worth checking. If you locate a stud, screw into it directly, it’s the strongest fixing available on a plasterboard wall and needs no anchors. On solid brick or block walls, studs aren’t relevant. Use a stud finder, or tap across the wall surface and listen for the sound to shift from hollow to solid, which tells you a stud is behind the board at that point.
Need your curtain pole fitted properly? Book a professional today
Enter your postcode to view our rates and availability in your area.
For questions about the services we offer visit our main site
Conclusion
Putting up a curtain pole properly comes down to patience at the planning stage. Get the measurements right, choose the correct fixings for your wall type, use a spirit level without skipping it, and add a centre support when the span calls for it. None of these steps is technically difficult. They just require not rushing.
The result is a pole that hangs straight, holds firmly, and makes the whole room look intentional rather than improvised. That’s worth an extra twenty minutes of care upfront.



Leave a Reply